Add Drama and Flair to Your Images Easily: Boris FX Optics Review
The Boris FX Optics suite is a powerful, easy-to-use photo editor that puts tons of effects at your fingertips.
There are dozens of photo editing suites on the market right now. Apart from Luminar, which offers AI editing features, the rest are just basic editors that allow you to change exposure values, remove blemishes, crop, and so on. Optics, from Boris FX, is different. While you can indeed make basic changes with Boris FX Optics, this package is more about adding flair and drama to your images through effects such as lightning, shadows, fog, stars, and more. We’ve had a short time to get to play with the Boris FX Optics suite. Is it right for you? Find out in our review.
Pros and Cons
Pros
- Hundreds of quality effects
- The UI is great and is easy to get to grips with
- An easy to use masking system
- It can be used as a standalone program or as a plug-in for Lightroom and Photoshop
- Nicely priced at $149
Cons
- You need a pretty beefy computer to run Boris FX Optics smoothly
Gear Used
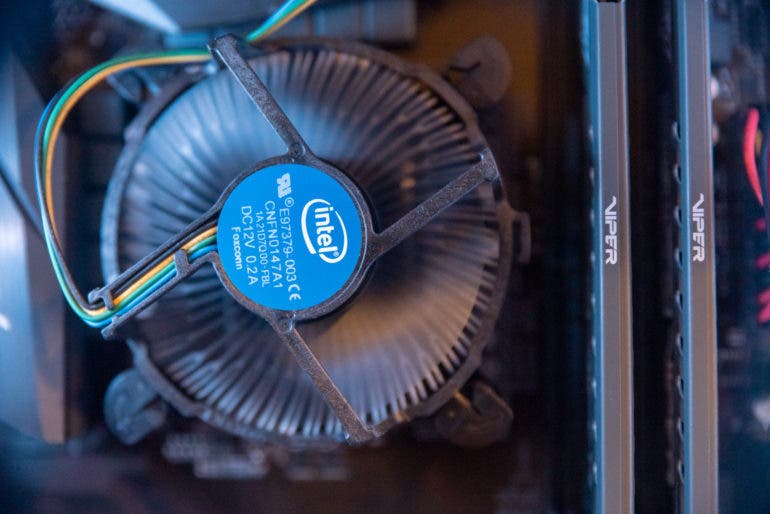
We used Boris Optics FX with a custom built PC that features a core I5 10400 CPU, 32GB of DDR4 RAM, Radeon 5700XT GPU, and various SSD’s and NVMe storage devices.
Features
The feature list below has been take from the official Boris FX website:
- Apply Optics and choose from 160 filters and thousands of presets. Optics provides everything you need to creatively enhance and improve photos using a staggering amount of filters and presets. Color grade your image using film-style controls or go from reality to sci-fi with incredible lighting effects.
- Filters are grouped into 9 categories: Color, Diffusion/Blurs, Film Lab, Grads/Tints. Image, Lens, Light, Render and Stylize
- Create stunningly beautiful and realistic lens flares, subtle soft glows, photorealistic lighting effects, stylized looks and treatments, and more. Optics features 75 of the Emmy Award-winning Sapphire filters from Boris FX. Used by top visual effects artists on the world’s most famous television and films, Sapphire’s superior image quality and on-screen controls offer massive time-savings and creative options. Top effects included with Optics:
- Recreate analog photography, and classic film looks with ease. Match vintage film stocks and grain, then customize looks to add luster and polish to your images. Or add film damage, scratches, and borders for an artfully decayed aesthetic.
- 294 color and black and white still photographic film stocks, motion picture films stocks, and historical photographic processes
- 89 color grading presets from Academy Award-nominated movies including 2001 A Space Odyssey, Apocalypse Now, Blade Runner, Back to the Future, Frankenstein, Gone with the Wind, King Kong, Saving Private Ryan, and Titanic
Performance

For the most part, Boris FX Optics runs fairly smoothly on my PC. I have a 10th Gen Intel I5, 32GB of RAM, a 5700XT GPU, and NVMe drives. However, there are times when applying effects that my computer would hiccup and stutter. Usually, when just applying presets, the software is fast, but note that if you get into multiple layers with effects in each, unless you have a mighty powerful computer, you will see a few performance issues. This, I might add, was with me choosing to run in 2K mode. In 4K mode, my computer ran like molasses uphill. There is an option above 4K. I did not try it as the heater in my home already does a fine job. You can take the resolution down below 2K if you wish, and that does increase performance.
Boris FX Optics – Ease of Use
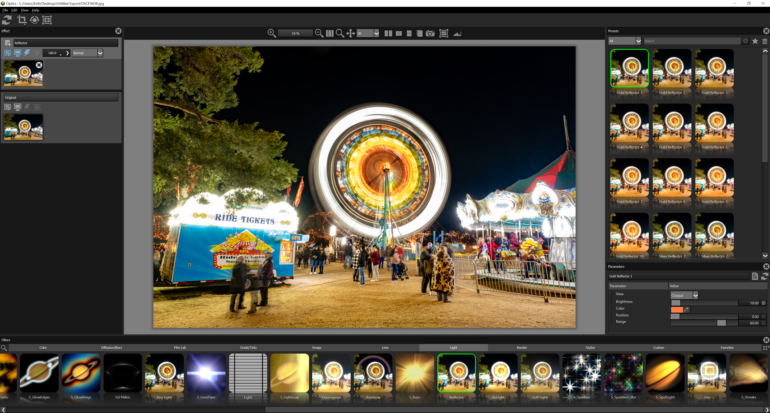
When you first open up the Boris FX Optics suite, you might feel a little overwhelmed. However, after just a few minutes, you’ll find that there was nothing to get worked up about. The layout is nice and clean, and all of the tools are easy to find. You’ll find the image you have selected and any subsequent layers you produce in the top left.
Along the top left, you’ll find reverse, crop, rotate, and mask icons. Along the top center, you’ll see the zoom and panning tools along with split-screen modes. The thousands of filters, presets, and effects live along the bottom of the software. Then on the right, you will see a breakdown of the effect category you have selected. On the right is also where you’ll find parameter sliders. This layout is the same regardless of whether you use Boris FX Optics as a stand-alone program, or as an Adobe Lightroom, or Photoshop Plug-in. You can, of course, set up the various windows in any configuration you want. I like the default setup. For the record, I mainly used Optics as a stand-alone program. It is an easy piece of software to customize and learn.
Selecting Effects
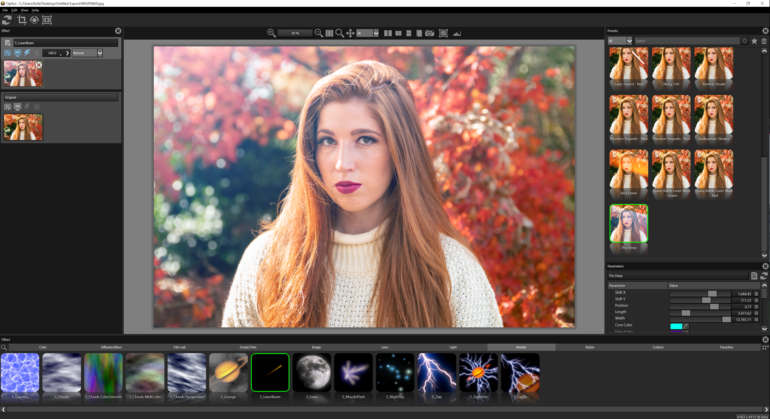
Once you have loaded your image into the software, you can go about adding whatever effects you please. This step is as easy as selecting what effect you want. This could be anything from film stocks, lighting effects, and color grading to effects rendering such as lightning, muzzle flashes, car headlights, fog, and so on. You click on a category, and all the effects in that category will appear on the right of the screen. Then, you click on any effect to get a preview, and you can play with that effect.
Moving the effects around just requires you to click and drag around the screen. You can then change the size, brightness, colors, blend modes, and a whole host of other settings in the parameters for that effect. You can apply just one or multiple effects to a single image. Each effect, once selected, will appear as a separate layer in the top left. It doesn’t take a degree to get around in Optics.
Masking
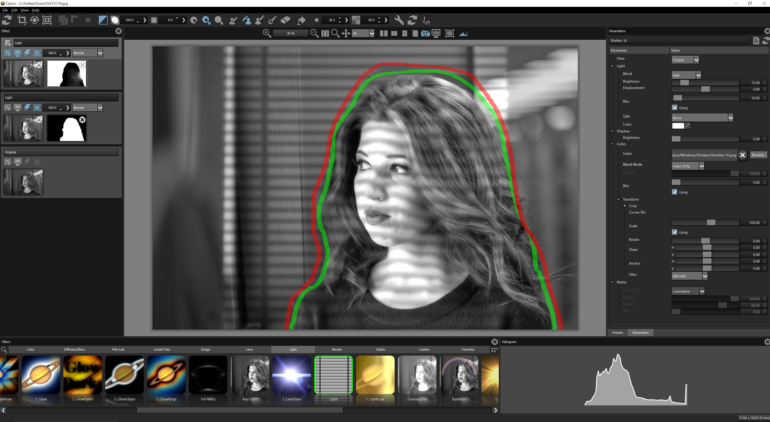
Now, masking is often a task that will make or break a piece of software. Masking can be quite a complex task, and incredibly daunting for newcomers to photo editing. However, Boris FX Optics has a slew of masking tools that can make this easy. You’ll find standard snap selection tools, which function just like the ones in Photoshop. However, perhaps the easiest way to mask is by using the EZMask tool. With the EZMask tool, you simply select your foreground objects by drawing around them with green and then selecting the background by drawing with red. The software can then intelligently apply your chosen effects. From there, you can apply effects to each layer, and do all sorts of manipulations to make the effects appear more natural. I’ll show an example below.
The Power Of Effects in Boris FX Optics

Here is a simple image of my model, Ashlee, looking out of a window. It’s an okay shot: nothing special and not a lot of drama. However, with a few simple clicks and a couple of EZMasks, I was able to add some shadow effects into the image.
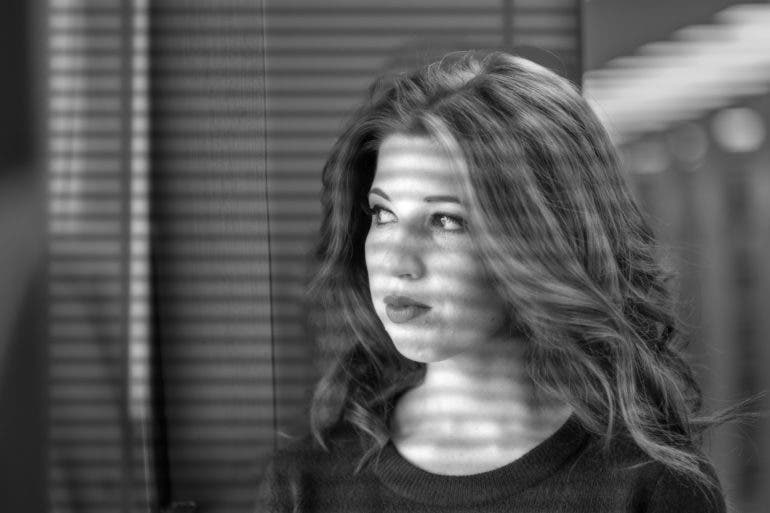
There are many lighting options to choose from in Optics, including different shadow effects from different styles of windows, blinds, foliage, water, and more. Here, I selected a simple shadow from some blinds. Now, here’s the real fun stuff. You can see in the background of the image that the shadows are straight. However, over Ashlee’s face, the shadows have contoured to the curves of her face. This is a powerful feature that can be found in the parameters. This image was created after playing around in the software for roughly 10 minutes. So, imagine what you’ll be able to create when you become well-versed. Here’s another example.

Above is the image from the camera. It’s a nice image, but again it lacks drama. With Boris FX Optics I was been able to add shadows cast from an imaginary window.

Here’s the result after picking one of the window options in the Light section of effects. It’s a simple edit, but it adds so much to the image. The shadow created by the window creates a nice frame around Ashlee, and it trains your eye on her. Again, this was incredibly easy to do. I spent just a little time placing the shadows and adjusting the parameters, and this is the result.
It’s Not Just About Shadows in Boris FX Optics

There’s honestly so much you can do with Boris FX Optics. It would take forever and a day to go over everything here. One option that will be popular with most is the film simulations included in the software. You’ll find your favorite emulsions from just about every film manufacturer in Boris FX Optics. The above image was edited using the Fujifilm Pro 400H film sim, and I just added some simple sun rays. You can make your images as simple or as complex as you want.

Do you want to add some stars to your images easily? You can do that too. I took the above photo on a cold night in December. There’s no way you’d be able to capture stars in the sky with the bright fairground light.
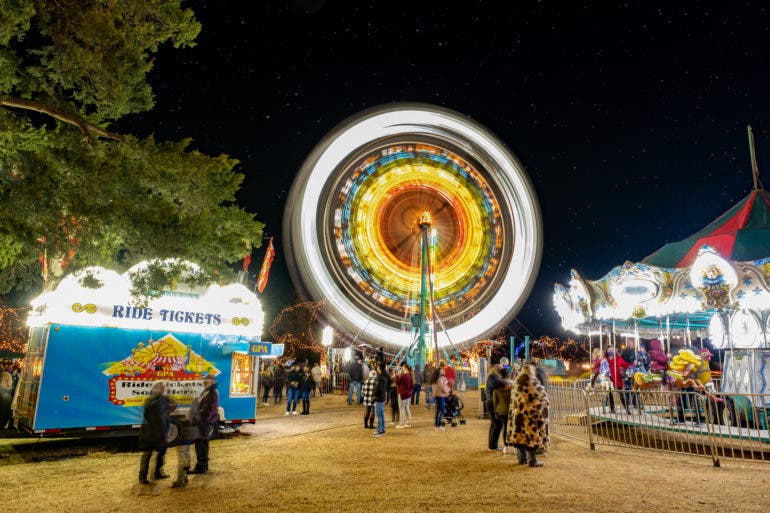
Above is the image with stars added in. What’s cool is that you can go into the parameters, and you can change the date and time, your altitude, the azimuth, your longitude, latitude, and time and the stars will shift in the sky to reflect their real-world position. Each effect will have its own set of parameters that you’ll be able to play around with to make your image picture-perfect.
The images I have shown reflect basic edits within this software. Still, with all of these tools at your disposal, the sky is the limit when it comes to what you’ll be able to create. Just know that the software is very easy to use. You’ll be adding effects and creating masterpieces in no time.
Boris FX Optics in Conclusion
Boris FX Optics is essentially a huge bundle of presets, overlays, and color grades wrapped up in a straighforward, easy-to-use piece of software. The fact that it can also be used inside Lightroom and Photoshop is a bonus. The quality of the presets and overlays are honestly some of the best I have seen. The easy to use interface makes Boris FX Optics enjoyable too. I typically do not use software like this to add effects to my images, so the edits I have done have been fairly simple. However, you could easily create stunning images in this software in a short amount of time.

Want to create futuristic Blade Runner-type images? You could do that here with no problems. Did you capture an image of a storm and want to add more atmosphere and lightning? You can do that too. Have you always wanted a large collection of simulated film stocks? Boris FX Optics will give you that and so much more. At $149, Boris FX Optics is priced really well, considering the quality of the assets used. I have had a lot of fun going back through my library of images and playing around with them. So, if you’re looking for a way to bring new life to old and new images, check out Boris FX Optics. Still not sure about it? You can grab a free trial here.